
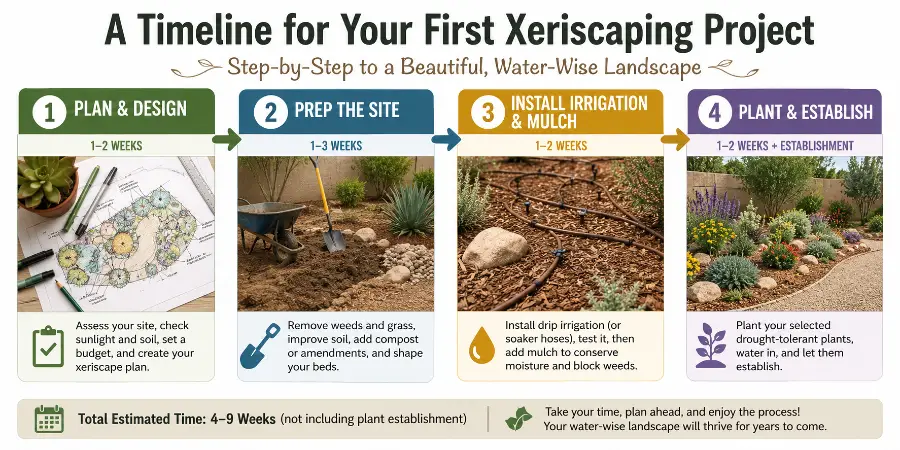
A timeline for your first xeriscaping project helps break the process into simple steps so you can build a low-water landscape without feeling overwhelmed.
From planning and budgeting to soil prep, planting, and watering, knowing what comes first makes the whole project easier to manage.
In this guide, you’ll learn the best order to tackle your first xeriscape so you can save time, avoid mistakes, and build a stronger water-wise garden.
What You’ll Learn
- What to do first when starting a xeriscape
- How to plan your budget and plant layout
- When to improve soil and install irrigation
- When to plant and mulch for best results
- How long early maintenance usually takes
Quick Answer
A first xeriscaping project usually starts with planning, site assessment, and budgeting, followed by soil prep, irrigation setup, planting, mulching, and several weeks of early plant establishment.
How to Plan Your First Xeriscaping Timeline
The best way to approach your first xeriscaping project is by breaking it into stages instead of trying to do everything at once.
A simple timeline helps you plan each phase, from choosing plants and improving soil to installing irrigation and adding mulch.
This keeps the project manageable and makes it easier to build a stronger low-water landscape from the start.
Planning Your Xeriscaping Project
When you’re planning your xeriscaping project, it’s super important to kick things off with a solid site assessment. Take a good look at your local climate, soil conditions, and what your garden space really needs.
This step sets the stage for creating a detailed project plan that includes a realistic budget and timelines for each phase of implementation. By keeping these factors in mind, you can make sure your xeriscape design not only thrives but also aligns with your budget and aesthetic goals.
This way, you’ll set yourself up for a successful and sustainable gardening experience.
Assessing Your Space and Needs
Assessing your space and needs is the first step in creating a successful xeriscaping project. Understanding your local climate and the specific characteristics of your garden space is essential.
By evaluating factors like sunlight exposure, soil type, and existing plants, you can figure out what works best for your xeriscape design. This assessment will help guide your plant selection, irrigation planning, and the overall layout of your garden, making sure your xeriscape thrives with minimal resources and maintenance.
A thorough site assessment isn’t just about taking a quick look at what’s there; it involves digging deeper into the local climate conditions that affect growth patterns and water needs. Start by checking out historical weather data to get a sense of rainfall fluctuations, temperature variations, and seasonal changes.
Then, do some soil testing to find out about pH levels, nutrient availability, and drainage capabilities. This info is crucial because it helps you tailor your plant choices, improving the ecological balance and sustainability of your landscaping.
In the end, recognizing the unique features of your garden space will set you up for a successful xeriscaping strategy that conserves water while adding beauty and functionality.
Creating a Budget and Timeline
Creating a budget and timeline for your xeriscaping project is crucial to keep things manageable and on track with your financial and aesthetic goals. Start by estimating the costs for materials, plants, and tools, and then allocate your funds wisely across each phase of the project.
Having a solid timeline will help you stay organized and focused as you move through the stages, from preparing the soil to planting and maintenance. This way, you can achieve the garden look you want without breaking the bank.
To tackle budgeting effectively, prioritize the essentials, like soil amendments and drought-resistant plants. These choices can really enhance the longevity and beauty of your landscape.
It’s also smart to set aside a little extra cash for any unexpected expenses that might pop up while you’re executing your plan. As you map out your timeline, consider the seasonal factors that could impact planting and growth, and aim for realistic deadlines to avoid rushing through important tasks.
By striking a balance between your financial limits and your vision, you’ll be able to cultivate a xeriscape that not only thrives but also offers an environmentally friendly solution that matches your landscape dreams.
Preparation and Design
Preparation and design are key when it comes to creating a xeriscape that not only saves water but also boosts the natural beauty of your garden.
Start by carefully selecting plants; go for native and drought-resistant species that will thrive in your local climate.
Don’t forget to think about your garden layout—incorporating hardscaping elements, mulch, and efficient irrigation can really elevate the look of your space while cutting down on water use.
This way, you’ll get a landscape that’s both functional and visually appealing.
Choosing Plants and Materials
Choosing the right plants and materials is key for your xeriscaping success because it directly affects both the health of your garden and its overall look. Focus on picking xeric plants that are perfectly suited to your local climate and soil conditions, and don’t forget to add some soil amendments to improve drainage and keep those nutrients in check.
By using sustainable gardening practices, like incorporating organic materials and native species, you’ll not only boost the beauty of your xeriscape but also do your part for environmental conservation.
When you emphasize xeric plant varieties, you can significantly cut down on water usage, making your landscape both stunning and efficient. Plus, with the right soil amendments, like compost and mulch, you can really improve your soil structure, which helps with moisture retention and fertility.
This healthy relationship between soil and plant selection creates a thriving ecosystem where your plants can flourish with minimal effort.
Using materials that manage water runoff is also crucial for keeping your plants happy and preserving the environment for future generations. When you bring all these principles together, you’ll create a resilient garden that requires less maintenance while showcasing vibrant and beautiful flora.
Creating a Layout and Design
Creating an effective garden layout and design is key to making your xeriscape look stunning while enjoying its ecological perks. Think about how you group your plants, the color schemes you choose, and the seasonal diversity you can maintain.
Don’t forget to integrate some hardscaping elements to really elevate the overall landscape architecture. A well-planned garden layout not only highlights the beauty of drought-tolerant plants but also helps foster a thriving ecosystem, turning your outdoor space into an inviting and sustainable haven.
Balancing your plant arrangement is super important since it helps create layers and texture, giving you a dynamic visual experience that changes with the seasons. Using native plants can take your xeriscape garden to the next level, as they’re already adapted to your local climate and soil conditions.
When you incorporate functional elements like paths and seating areas, you encourage people to interact with the space while keeping it accessible. These days, landscaping trends are all about aligning design with ecological health, ensuring that every choice you make adds to both the beauty and resilience of the environment around you.
Implementation and Maintenance
Successfully implementing and maintaining your xeriscaped garden is key to ensuring it stays beautiful for the long haul.
Start off with the right gardening tools and watering techniques to help your plants establish themselves and create a thriving environment.
Regular care is essential—monitor for pests and keep an eye on soil health. This way, your xeric garden will not only flourish but also require minimal resources and effort as time goes on.
Tips for Successful Implementation
To successfully pull off your xeriscaping project, keep a few essential tips in mind that can make the process smoother and boost your garden’s performance.
Start by using efficient watering techniques like drip irrigation, which conserves water while delivering it right to the roots of your plants. And don’t underestimate the power of quality garden tools—having the right ones can really make tasks like soil preparation and planting a breeze, turning the whole experience into something enjoyable.
It’s also important to check out your local climate and pick the right native plants that can thrive in arid conditions. This choice will help cut down on the need for excessive watering.
Plus, mulching is your friend; it can really help retain soil moisture and keep those pesky weeds at bay, creating a healthier environment for your garden.
Regular maintenance with the right tools not only keeps your xeriscaped space looking vibrant but also promotes sustainability. By weaving these strategies into your gardening routine, you’ll create a visually stunning landscape while embracing eco-friendly practices that make the most of your resources.
Maintenance and Upkeep for Long-Term Success
Ongoing maintenance and upkeep are crucial for you to achieve long-term success in your xeriscaped garden, keeping it vibrant and healthy through all the seasonal changes. Regular plant care, like adjusting your watering routine and tackling pest issues, will help your drought-resistant plants thrive while looking great. By focusing on sustainable gardening practices, you’ll not only conserve resources but also contribute positively to the local ecosystem.
Implementing techniques such as mulching and seasonal pruning can really help you optimize water retention and promote strong growth in your xeriscaped landscape. Adjusting your watering schedule based on the weather ensures that your plants get just the right amount of moisture without drowning them.
Plus, incorporating native plants can boost biodiversity since they’re naturally adapted to local conditions and require less care.
Regularly checking in on your garden and making tailored adjustments not only keeps it looking good but also nurtures a resilient environment, creating a lovely habitat for beneficial wildlife.
Timeline for Your First Xeriscaping Project FAQs
How long does a xeriscaping project take?
Small xeriscaping projects can take a few weekends, while larger projects may take several weeks or months depending on size and complexity.
What should I do first?
Start by assessing sunlight, drainage, soil, and how you want the space to function before choosing plants.
When is the best time to start xeriscaping?
Fall and early spring are often the best times because temperatures are milder and plants establish easier.
Should irrigation go in before planting?
Yes. Installing drip irrigation or watering zones before planting usually makes the process easier.
How soon should I mulch after planting?
Mulch should go down right after planting to help retain moisture and reduce weeds.
Final Thoughts
Starting your first xeriscaping project is much easier when you work in stages instead of rushing the whole process.
A clear timeline helps you plan better, avoid wasted effort, and build a stronger low-water landscape from the beginning.
With the right order and a little patience, xeriscaping becomes much more manageable and rewarding long term.
Explore More Beginner Xeriscaping Guides
What is xeriscaping? A beginner’s guide to drought-tolerant landscaping – CSU